1. What is Consul?
From Consul's introduction:
Consul has multiple components, but as a whole, it is a tool for discovering and configuring services in your infrastructure.
It provides several key features:
- Service Discovery: Clients of Consul can provide a service, such as api or mysql, and other clients can use Consul to discover providers of a given service. Using either DNS or HTTP, applications can easily find the services they depend upon.
- Health Checking: Consul clients can provide any number of health checks, either associated with a given service ("is the webserver returning 200 OK"), or with the local node ("is memory utilization below 90%"). This information can be used by an operator to monitor cluster health, and it is used by the service discovery components to route traffic away from unhealthy hosts.
- Key/Value Store: Applications can make use of Consul's hierarchical key/value store for any number of purposes, including dynamic configuration, feature flagging, coordination, leader election, and more. The simple HTTP API makes it easy to use.
- Multi Datacenter: Consul supports multiple datacenters out of the box. This means users of Consul do not have to worry about building additional layers of abstraction to grow to multiple regions.
Consul is designed to be friendly to both the DevOps community and application developers, making it perfect for modern, elastic infrastructures.
2. Latest Version
As of writing, the latest version is v0.6.4.
3. Installation
Assume that we have two servers (Ubuntu 14 and 16, 64bit) in this practice:
192.168.56.118
192.168.56.119
We must install Consul in both server before further exploring.
$ mkdir ~/consul
$ cd ~/consul
$ wget https://releases.hashicorp.com/consul/0.6.4/consul_0.6.4_linux_amd64.zip
$ unzip consul_0.6.4_linux_amd64.zip
$ mv consul /usr/local/bin
$ consul -v
Consul v0.6.4
Consul Protocol: 3 (Understands back to: 1)
4. Start Up
There are several types of roles in Consul cluster:
- Server
- Client
The Server type also has Bootstrap mode or "normal" server. I won't deep dive too much as all the details can be further refered to Consul's Documentation.
4.1 As Bootstrap Instance
$ consul agent -server -bootstrap-expect 1 -data-dir /tmp/consul
But we may encounter issues like “Failed
to get advertise address: Multiple private IPs found. Please configure one.” which is because we have multiple network adapters configured.
In this case, start it up this way:
$ consul agent -server -bootstrap-expect 1 -data-dir /tmp/consul -bind 192.168.56.119
4.2 As Other Server/Client Instance
In other servers, we should start it up as normal
server (without -bootstrap):
$ consul agent -server -data-dir /tmp/consul -bind 192.168.56.118
Or client:
$ consul agent -data-dir /tmp/consul -bind 192.168.56.118
Note: “No cluster leader” will happen after this command because it cannot find
a cluster leader and is not enabled to become the leader itself. This state
occurs because our second and third server are enabled, but none of our servers
are connected with each other yet.
5. consul join
To connect to each other, we need to join
these servers to one another. This can be done in any direction.
So we can do it in any server, let say 192.168.56.119 and join another in:
$ consul join 192.168.56.118
Successfully joined cluster by contacting 1 nodes.
6. consul members
We can check our members and statuses:
$ consul members
Node       Address              Status  Type    Build  Protocol  DC
ubuntu-14  192.168.56.118:8301  alive   server  0.6.4  2         dc1
ubuntu16   192.168.56.119:8301  alive   server  0.6.4  2         dc1
7. Configuration
As a best practice, we should create a dedicated folder for
further configuration, like services and checks.
$ sudo mkdir /etc/consul.d
And restart the agent with "-config-dir" specified:
- For Bootstrap agent/server:
$ consul agent -server -bootstrap-expect 1 -data-dir /tmp/consul -bind 192.168.56.119 -config-dir /etc/consul.d
- For normal agent/server:
$ consul agent -server -data-dir /tmp/consul -bind 192.168.56.118 -config-dir /etc/consul.d
7.1 Add
Service & Health Check
That's the sexiest part of Consul.
Let’s use ngix, one of
the most popular HTTP servers, as an example.
In both nodes, install
the nginx:
$ sudo apt-get install nginx
And create a service file into our
configuration folder:
$ sudo touch /etc/consul.d/web.json
$ sudo vim /etc/consul.d/web.json
Verify whether nginx is working:
$ curl --noproxy '*' 127.0.0.1
The web.json content is as below:
{
    "service": {
        "name": "web",
        "port": 80,
        "tags": ["nginx", "dev"],
        "check": {
            "script": "curl --noproxy '*' 127.0.0.1 > /dev/null 2>&1",
            "interval": "10s"
        }
    }
}
We can enable the service without restarting Consul by sending it a SIGHUP (1) signal:
$ ps –ef|grep
bright    4583  2415  1 09:21 pts/0    00:00:06 consul agent -server -bootstrap-expect 1 -data-dir /tmp/consul -bind 192.168.56.119 -config-dir /etc/consul.d
$ sudo kill -1 4583
==> Caught signal: hangup
==> Reloading configuration...
…
    2016/08/20 09:33:05 [INFO] agent: Synced service 'web'
8. Web UI Console
We can enable the built-in UI by simply adding “-ui” parameter when we start it up:
$ consul agent -server -bootstrap-expect 1 -data-dir /tmp/consul -bind 192.168.56.119 -config-dir /etc/consul.d –node=node1 –ui -client=192.168.56.119
Caution: we also need to specify “-client” here to “expose” the address.
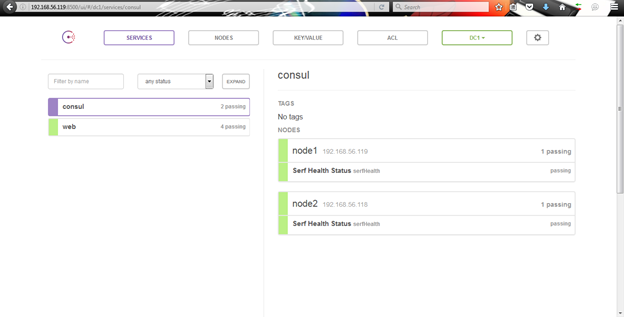
Now open browser and key in: http://192.168.56.119:8500/ui/
We can always see a default “consul” service which is itself:

Click the “web” tab and we can see our web service is “passing” which means healthy.
Of course, there are more features in the web UI Console pending for further exploring.
Well, we have done our "get started" part for Consul.


No comments:
Post a Comment